Introduction to Sagemaker Extension
With the use case of Predictions for Credit Application Risks we want to introduce you Machine Learning with the AWS Sagemaker Autopilot service, where we show how to develop and utilize an end-to-end machine learning project on data stored in Exasol using the AWS SageMaker Autopilot service as the backend for Machine Learning.
AWS Sagemaker Autopilot Service
AWS SageMaker is an AWS public cloud service in which users can build and deploy machine learning models. SageMaker provides a number of levels of abstraction to users while developing machine learning models. At one of its highest level of abstraction, SageMaker enables users to use an Automated Machine Learning (AutoML) service, called Autopilot in AWS, that automatizes the process of applying machine learning to real world problems.
Autopilot covers a complete pipeline of developing an end-to end machine learning project, from raw data to a deployable model. It is able to automatically build, train and tune a number of machine learning models by inspecting your data set. In this way, the following tasks, which are repeatedly applied by ML-experts in machine learning projects, are automated:
- Pre-process and clean the data
- Perform feature engineering and select the most appropriate ones
- Determine the most appropriate ML algorithm
- Tune and optimize hyper-parameters of model
- Post-process machine learning models
The Exasol Sagemaker Extension takes these advantages of AWS Autopilot and enables users to easily create effective and efficient machine learning models without expert knowledge.
Exasol SageMaker Extension
The Exasol Sagemaker Extension provides a Python library together with Exasol Scripts and UDFs that train Machine Learning Models on data stored in Exasol using AWS SageMaker Autopilot service.
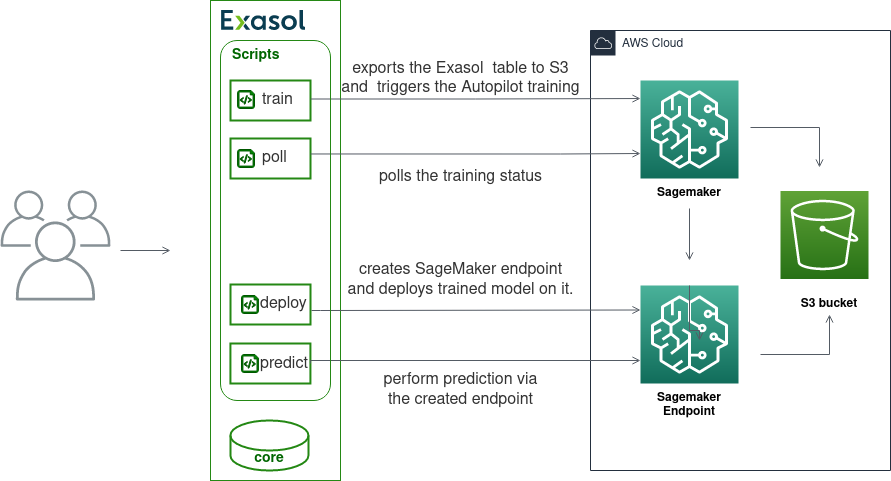
The extension basically exports a given Exasol table into AWS S3, and then triggers Machine Learning training using the AWS Autopilot service with the specified parameters. In addition, the training status can be polled using the auxiliary scripts provided within the scope of the project. In order to perform prediction on a trained Autopilot model, one of the methods is to deploy the model to the real-time AWS endpoint. This extension provides Lua scripts for creating/deleting real-time endpoint and creates a model-specific UDF script for making real-time predictions. The following figure indicates the overview of this solution.
Prerequisites for this Module
In case of enabled Multi-Factor-Authentication for your user please mind the following article from AWS:
https://github.com/exasol/sagemaker-extension/issues/90
In AWS Identiy and Access Managemnt (IAM) create a role named
sagemaker-role
and add two policies to add, firstly:
{
    "Version": "2012-10-17",
    "Statement": [
        {
            "Effect": "Allow",
            "Action": [
                "s3:*"
            ],
            "Resource": "*"
        },
        {
            "Effect": "Allow",
            "Action": [
                "iam:CreatePolicy",
                "iam:CreateRole",
                "iam:AttachRolePolicy",
                "iam:DeleteRole",
                "iam:DeletePolicy",
                "iam:DetachRolePolicy"
            ],
            "Resource": "*"
        }
    ]
}
and name it sagemaker-s3-access. For the second policy for this role search for and select
AmazonSageMakerFullAccess
Finally attach the policies to the sagemaker-role with the aws tool on the Deployment Server:
aws iam attach-role-policy --role-name sagemaker-role --policy-arn arn:aws:iam::166283903643:policy/sagemaker-s3-access
aws iam attach-role-policy --role-name sagemaker-role --policy-arn arn:aws:iam::aws:policy/AmazonSageMakerFullAccess
The following workaround should be only utilized in case of an unresovable behaviour, e.g. a security error when starting the training job (later in this tutorial)
Create new user account named Sagemaker Account and create for this account the neccessary AWS Access Key. Attach the following policy directly to this user account.
{
    "Version": "2012-10-17",
    "Statement": [
        {
            "Effect": "Allow",
            "Action": "*",
            "Resource": "*"
        }
    ]
}
Be careful with this role as it non-restricive to AWS services - use it with the outmost care. However, you need to create the sagemaker role as it is required later on…